Windows10にDocker環境をインストールする方法をソースコード付きでまとめました。
## 【はじめに】Windows10にDocker環境をインストールできる条件
Windows10環境でインストールできるDockerは「Docker Desktop(Windows)」もしくは「Docker Toolbox」の2種類です。
| 種別 | 概要 |
|---|---|
| Docker Desktop | 旧Docker for Windowsことで、Hyper-Vを使用したOSネイティブで動作します。「Hyper-V」はWindows10 proにしかない機能なため、「Windows10がPro版」あることがDocker環境を構築できる条件となります。 |
| Docker Toolbox | VirtualBox を使って Linux仮想マシンを作成し、その上でDockerを動作させます。そのため、Windows10 Homeユーザーでも利用できるDocker環境となります。 |
## 【導入手順①】Docker Desktopの場合
Docker Desktopの導入手順を紹介します。
動画解説
本ページの内容は動画でも紹介しています。
Hyper-Vの有効化
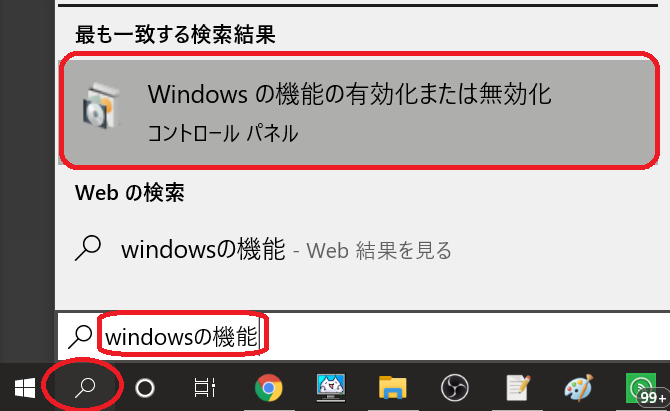
① タスクバーの検索ボックスで「winodwsの機能」と入力し[windowsの機能]を開きます。
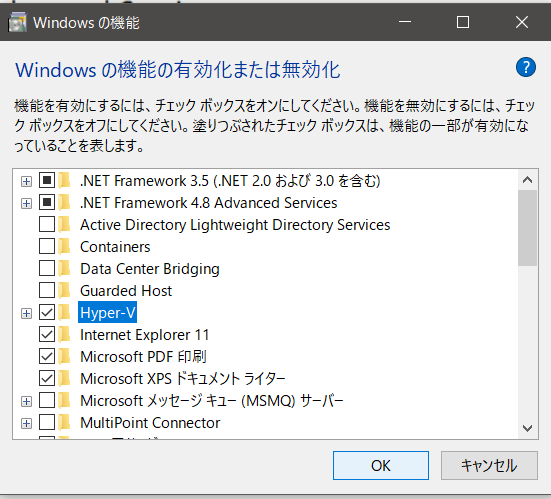
② [Hyper-V]にチェック後を入れて[OK]をクリックします。
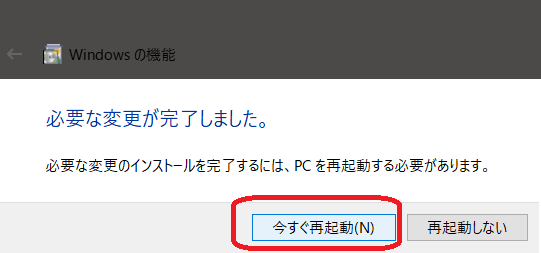
③ 再起動を求められるので、再起動します。
インストール
① 公式サイト(https://hub.docker.com/)にアクセスし[Sign up…]というボタンをクリックします。
② [Docker ID] [E mail] [Password]を設定しアカウント登録します。
③ メールアドレスに認証用URLが送られてくるのでクリックすれば登録完了です。
④ ログインした状態で(https://hub.docker.com/)にアクセスし[Get Started…]というボタンをクリックします。
⑤ [Download docker…]というボタンをクリックします。
⑥ ダウンロードしたインストーラ(Docker for Windows Installer.exe)をダブルクリックして起動し、指示に従って進んでインストールします。
⑦ 完了して[Logoff …]というボタンが表示されるのでクリックします。
すると再起動がはじまります。
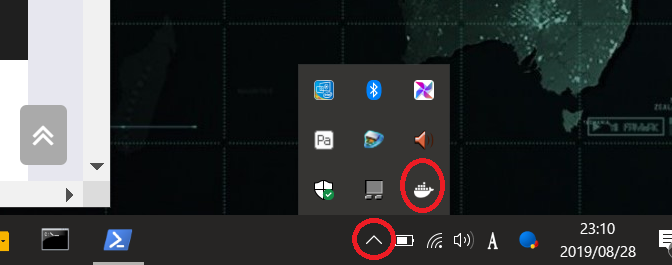
⑧ 再起動すると、「Docker desktop」が自動で起動し、タスクトレイにDockerアイコンが表示されます。
エラーが出た場合は、「【Docker for windows】エラーで起動できない場合の対策」を参考にしてください。
基本設定
Docker Desktopの基本設定について紹介します。
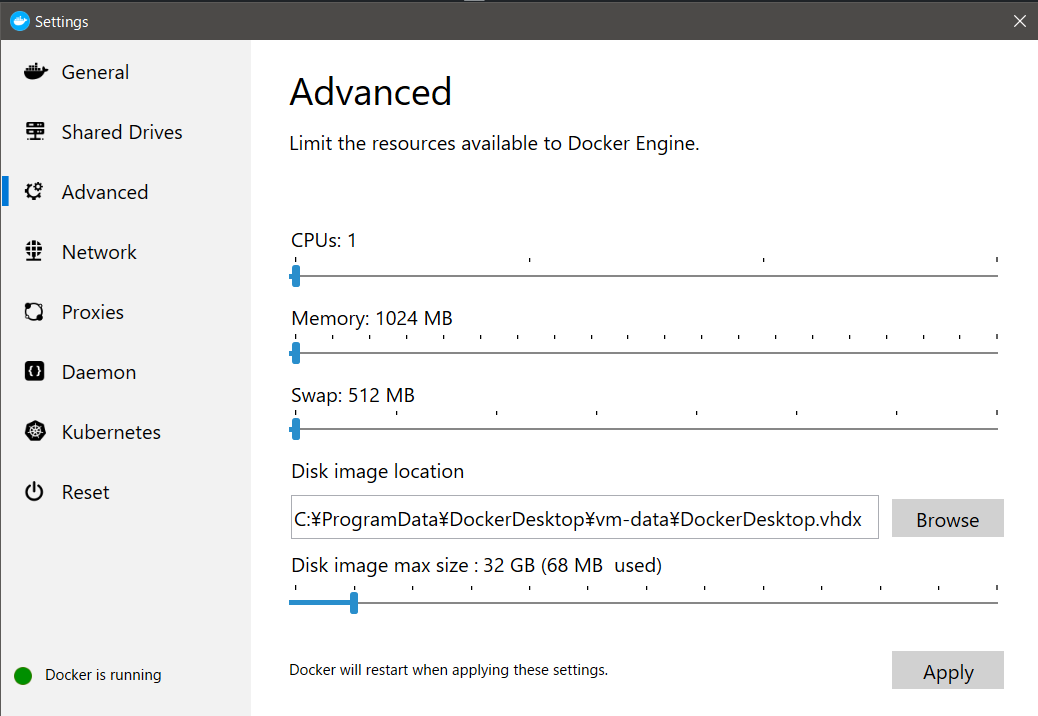
① タスクトレイの[Dockerアイコン]を右クリックし、[Settings]を開きます。
② [Advanced] で利用するCPUコア数、メモリ容量、ドライブの容量などを設定できます。
メモリ不足でエラーが発生したり、PC動作が重い場合は、CPUコア数やメモリ容量を下げましょう。
[Apply]ボタンをクリックするとWindowsアカウントのパスワードを求めらので入力すれば設定完了です。
## 【導入手順②】Docker Toolboxの場合
Docker Toolboxの導入手順を紹介します。
## 【動作確認】Docker Hubにログイン、Hello World
動画解説
本ページの内容は、動画でも紹介しています。
いよいよDockerを使っていきます。
① コマンドプロンプト、もしくはPowershellを起動し、以下のコマンドでDocker Hubにログインします。
docker login

Authenticating with existing credentials...
Stored credentials invalid or expired
Login with your Docker ID to push and pull images from Docker Hub. If you don't have a Docker ID, head over to https://hub.docker.com to create one.
Username (xxxx@xxxx): xxxxxx  ← ユーザIDを入力
Password:            ← パスワード

Login Succeeded ← これが表示されたらログイン成功
② 以下のコマンドを実行します。
docker run hello-world


Unable to find image 'hello-world:latest' locally
latest: Pulling from library/hello-world
1b930d010525: Pull complete                                                                                             Digest: sha256:451ce787d12369c5df2a32c85e5a03d52cbcef6eb3586dd03075f3034f10adcd
Status: Downloaded newer image for hello-world:latest

Hello from Docker!
This message shows that your installation appears to be working correctly.

To generate this message, Docker took the following steps:
 1. The Docker client contacted the Docker daemon.
 2. The Docker daemon pulled the "hello-world" image from the Docker Hub.
    (amd64)
 3. The Docker daemon created a new container from that image which runs the
    executable that produces the output you are currently reading.
 4. The Docker daemon streamed that output to the Docker client, which sent it
    to your terminal.

To try something more ambitious, you can run an Ubuntu container with:
 $ docker run -it ubuntu bash

Share images, automate workflows, and more with a free Docker ID:
 https://hub.docker.com/

For more examples and ideas, visit:
 https://docs.docker.com/get-started/
Docker Hubから「hello-world:latest」イメージをダウンロードし、sha256でハッシュ化しています。
② 以下のコマンドで、現在のイメージとコンテナを確認できます。
$ docker images
REPOSITORY          TAG                 IMAGE ID            CREATED             SIZE
hello-world         latest              4ab4c602aa5e        3 months ago
③ 起動中のコンテナを確認します。
$ docker ps
CONTAINER ID        IMAGE               COMMAND             CREATED             STATUS              PORTS               NAMES
hello-worldコンテナはメッセージ出力が終わるとコンテナを停止してしまうため、起動中には何もありません。
③ -a オプションを付けて停止中のコンテナを確認します。
$ docker ps -a
CONTAINER ID        IMAGE               COMMAND             CREATED             STATUS                      PORTS               NAMES
xxxxxxxxxxxx        hello-world         "/hello"            51 minutes ago      Exited (0) 51 minutes ago                       reverent_raman
hello-worldイメージとコンテナが確認できます。
④ hello-worldのコンテナを削除します。
# docker ps -a コマンドで確認したコンテナIDを指定
$ docker rm xxxxxxxxxxxx
④ hello-worldのイメージを削除します。
$ docker rmi hello-world
ちなみに、イメージのインスタンスがコンテナです。
イメージを起動すると、そのイメージのコンテナが動作します。
同じイメージから複数のコンテナを動作させることもできます。
| – | 関連記事 |
|---|---|
| 1 | 【Windows10】Docker環境をインストールする方法 |
| 2 | 【Docker入門】使い方を初心者向けに紹介 |

コメント