AngularJSで二次元配列に要素を追加して表に出力する方法について入門者向けにまとめました。
## 【配列】二次元配列に要素を追加・表に出力
AngularJSで二次元配列に要素を追加して表に出力します。
import { Component } from '@angular/core';

// コンポーネントの構成情報を定義するデコレータ
@Component({
  // コンポーネントの適用先を表すセレクター式
  selector: 'app-root',

  // コンポーネントに適用するスタイルシート
  styleUrls: ['./app.component.css'],

  // コンポーネントに適用するテンプレート(外部ファイルから読み込み)
  templateUrl: './app.component.html',
})

export class AppComponent {
  constructor() {
    // 2次元配列の宣言
    this.data = {any:[
            ["1-1", "1-2", "1-3"],
            ["2-1", "2-2", "2-3"]
        ]

    }

    // 要素を追加
    this.data.any.push(["3-1", "3-2", "3-3"]);
  };

};
■app.component.html
<table>
 <ng-container *ngFor="let row of data.any; let i = index">
  <tr>
   <ng-container *ngFor="let col of row; let j = index">
    <td>{{col}}</td>
   </ng-container>
  </tr>
 </ng-container>
</table>
■app.component.css
table{
    text-align:center;
    width:100%;
}

td{
    padding-top:7px;
    padding-bottom:7px;
    /* font-size:40px; */
}

table th{
    color:#eee;
    background-color: rgb(78, 54, 24);
}

/* 偶数行の背景色変更 */
tr:nth-child(2n) {
    background: rgb(226, 239, 209);
}

/* 奇数行の背景色変更 */
tr:nth-child(2n+1) {
    background: rgb(238, 238, 238);
}
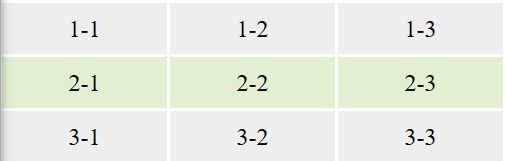
■実行結果
| – | 参考文献・関連記事 |
|---|---|
| 参考 | ■【TypeScript入門】使い方まとめ |
| 参考 | ■【AngularJS入門】基礎とサンプル集 |
| 関連 | ■【Ionic入門】Android・iPhoneアプリ開発編 |


コメント